
This guide provides comprehensive solutions for Jandy JXi pool heater issues‚ helping users diagnose and resolve common problems like ignition failures and error codes efficiently.
Designed for both novices and experienced users‚ it offers clear‚ step-by-step instructions to restore functionality and ensure optimal performance‚ minimizing pool heating downtime.
Overview of the Jandy JXi Pool Heater
The Jandy JXi pool heater is a high-efficiency‚ eco-friendly solution designed for residential and commercial pools. Known for its compact design‚ it offers advanced features like a user-friendly interface and reliable performance. With a focus on energy savings‚ the JXi series incorporates cutting-edge technology to minimize fuel consumption while maintaining consistent water temperatures. Its durable construction ensures long-lasting reliability‚ even in harsh weather conditions. The heater also includes safety features such as automatic shut-off and flame failure detection‚ ensuring safe operation. Available in various models‚ the JXi caters to different pool sizes and heating requirements. Its sleek design and quiet operation make it a preferred choice for pool owners seeking a hassle-free heating experience.
Importance of Regular Maintenance and Troubleshooting
Regular maintenance and troubleshooting are essential for ensuring the Jandy JXi pool heater operates efficiently and safely. Neglecting these practices can lead to premature wear‚ higher energy bills‚ and even safety hazards. By addressing issues early‚ you can prevent minor problems from escalating into costly repairs. Troubleshooting helps identify faults like error codes‚ ignition failures‚ or gas supply issues‚ allowing for timely fixes. Proper upkeep also extends the heater’s lifespan and maintains optimal performance‚ ensuring consistent pool temperatures. Additionally‚ routine checks can uncover hidden issues‚ such as corroded wiring or faulty sensors‚ before they cause system downtime. A well-maintained JXi heater not only saves money but also enhances your swimming experience.

Common Error Codes and Their Meanings
The Jandy JXi displays error codes like E01‚ E02‚ and E03‚ indicating issues such as ignition failures or sensor malfunctions. A red LED on the PIB board (D4) signals faults.
These codes guide users to specific problems‚ such as faulty igniters‚ flame sensors‚ or gas valves‚ aiding in precise troubleshooting and swift resolution of heating issues.
Understanding the LED Indicators on the JXi Heater
The Jandy JXi heater features LED indicators that provide essential diagnostic information. These lights display error codes and operational status through color changes and blinking patterns. For example‚ a steady green light typically indicates normal operation‚ while a flashing red light may signal a fault. Understanding these indicators is crucial for quick troubleshooting. The LEDs are located on the control board and correspond to specific issues like ignition failures or sensor malfunctions. Referencing the user manual or troubleshooting guide is recommended to decode the meanings of different LED patterns accurately. This visual system helps users identify problems early‚ preventing further damage and ensuring efficient repairs. Regular monitoring of these indicators can enhance heater performance and longevity.
Interpreting Error Codes for Accurate Diagnosis
Understanding error codes is crucial for diagnosing issues with the Jandy JXi pool heater. These codes provide specific insights into system malfunctions‚ helping users identify the root cause quickly. For example‚ a flashing red LED may indicate a faulty PIB board or ignition problems. By referencing the user manual or troubleshooting guide‚ users can match error codes to their corresponding issues‚ such as gas valve failures or sensor malfunctions.
Accurate diagnosis ensures targeted repairs‚ reducing downtime and potential damage. If error codes persist despite troubleshooting‚ consulting a professional is recommended to resolve complex issues efficiently. This systematic approach simplifies maintenance and extends the heater’s lifespan.

Troubleshooting Ignition Issues
Diagnose ignition problems by checking the igniter‚ flame sensor‚ and gas valve for proper function. Address error codes related to ignition failures and post-winter startup issues promptly.
Checking the Igniter and Flame Sensor
Inspecting the igniter and flame sensor is critical for diagnosing ignition issues. Ensure the igniter is clean and free from corrosion‚ as dirt or moisture can prevent proper spark generation. Use a soft brush or cloth to clean the igniter electrode. Next‚ check the flame sensor for signs of wear or rust. A faulty flame sensor may fail to detect a flame‚ causing the heater to shut off. Test the flame sensor’s continuity using a multimeter to ensure it’s functioning correctly. If either component is damaged‚ replace it immediately to restore reliable ignition. Always refer to the Jandy JXi manual for specific guidance on these components.
Identifying Problems with the Gas Valve
Issues with the gas valve can prevent proper ignition or disrupt the heating cycle. Common problems include faulty solenoids‚ debris buildup‚ or improper alignment.
Check for error codes related to gas flow‚ such as those indicating low pressure or valve failure. Inspect the valve for dirt or corrosion and clean it if necessary;
Ensure the valve is fully open and functioning smoothly. If problems persist‚ consider replacing the gas valve or consulting a professional for assistance.
Regular maintenance‚ like cleaning and lubricating moving parts‚ can help prevent future issues and ensure reliable operation of the Jandy JXi pool heater.
Inspecting the Ignition Control Module
The ignition control module (ICM) is a critical component of the Jandy JXi pool heater‚ responsible for managing the ignition process. If the heater fails to ignite or cycles intermittently‚ the ICM may be at fault. To inspect it‚ first‚ ensure the heater is turned off and allowed to cool. Locate the ICM‚ typically found near the gas valve or igniter. Check for visible signs of damage‚ such as burn marks or cracks. Verify all wiring connections to the ICM are secure and free from corrosion. If the module appears damaged or faulty‚ it may need replacement. Always refer to the troubleshooting guide for specific error codes related to the ICM before attempting repairs.

Resolving Heating Cycle Interruptions
Heating cycle interruptions often stem from faulty thermostats or sensors‚ causing the heater to turn on and off repeatedly. Check thermostat settings and sensor functionality.
Ensure proper gas flow and ignition; a malfunctioning gas valve or faulty igniter can disrupt the heating cycle. Refer to the ignition troubleshooting section for solutions.
Why the Heater Turns On and Off Repeatedly
The Jandy JXi heater may cycle on and off repeatedly due to several issues. One common cause is low gas pressure‚ which prevents the heater from maintaining a consistent flame. Additionally‚ faulty ignition components‚ such as a malfunctioning igniter or flame sensor‚ can disrupt the heating cycle. Water flow problems‚ like insufficient circulation or blockages in the pool pump‚ may also trigger this behavior. Finally‚ thermostat settings or sensor malfunctions could cause the heater to shut off prematurely. Addressing these issues requires checking gas lines‚ inspecting ignition parts‚ and ensuring proper water flow. If unresolved‚ consult a professional to prevent further damage and ensure safe operation.
- Check gas pressure and lines for leaks or blockages.
- Inspect the igniter‚ flame sensor‚ and ignition control module.
- Ensure proper water circulation and pump function.
- Verify thermostat settings and sensor accuracy.
For persistent issues‚ refer to the troubleshooting guide or contact a qualified technician.
Addressing Issues with the Thermostat Settings
Thermostat-related problems can cause inconsistent heating or complete shutdown of your Jandy JXi pool heater. Common issues include incorrect temperature settings‚ faulty sensors‚ or power supply disruptions. First‚ ensure the thermostat is set to the correct temperature and mode. If the heater cycles on and off repeatedly‚ check for improper calibration or loose connections. Resetting the thermostat or replacing the sensor may resolve the issue. After a power outage‚ allow the system to reset properly before testing. If problems persist‚ consult a professional to diagnose and repair any underlying electrical or sensor-related faults. Proper thermostat function is crucial for efficient and safe operation of your pool heater.
- Verify temperature settings and mode accuracy.
- Check for sensor malfunctions or loose connections.
- Reset the system after power disruptions.
- Consult a professional for persistent issues.

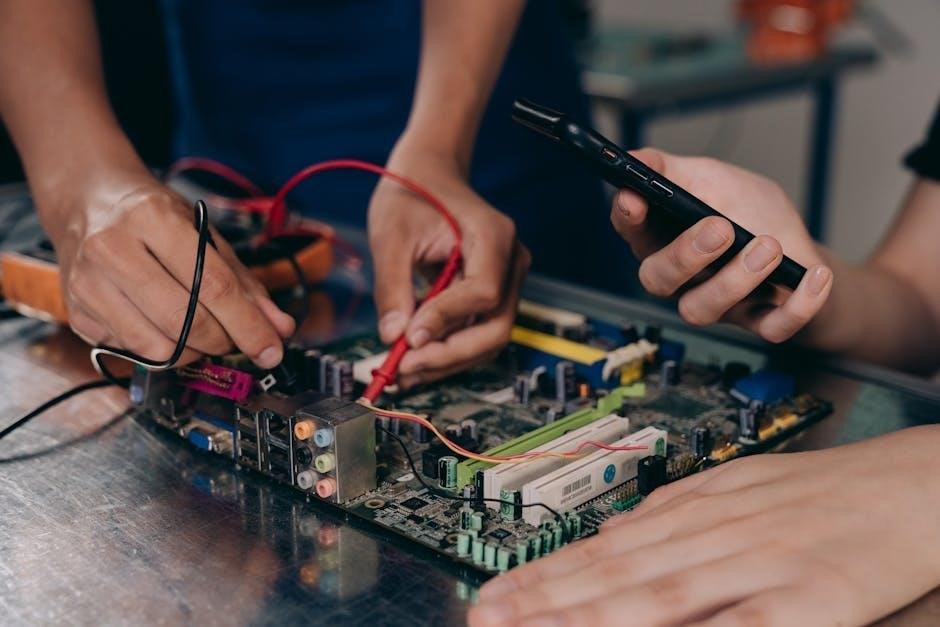
Diagnosing Electrical and Wiring Problems
Check for loose or corroded wiring connections‚ which can cause ignition issues or error codes. Inspect the circuit board and ignition components for faults or damage.
Identifying Loose or Corroded Wiring Connections
Loose or corroded wiring connections are common issues that can disrupt the Jandy JXi heater’s operation. Start by turning off the power supply to the heater for safety. Inspect all wiring harnesses‚ paying attention to connections near the ignition control module‚ gas valve‚ and flame sensor. Look for visible signs of corrosion‚ rust‚ or wear. Use a multimeter to test for continuity and voltage drops across connections. If you find loose wires‚ tighten them securely. For corroded connections‚ clean them with a wire brush or replace the affected wires. Regularly checking and maintaining wiring can prevent ignition failures and error codes‚ ensuring smooth heater performance. Always refer to the user manual or consult a professional if unsure.
Testing the Circuit Board for Faults
Testing the circuit board on your Jandy JXi heater involves checking for electrical faults that may cause malfunctions. Start by ensuring the heater is turned off and disconnected from power. Use a multimeter to test voltage and continuity across key components. Inspect for signs of physical damage‚ such as burn marks or corroded connections. Check all solder joints for cracks or wear. If you find faulty components‚ replace them carefully. If issues persist‚ consider replacing the entire circuit board. Always refer to the manufacturer’s guidelines for specific testing procedures. If you’re unsure‚ consult a qualified technician to avoid further damage or safety risks.
- Use a multimeter to verify voltage and continuity.
- Inspect for physical damage or corrosion.
- Replace faulty components or the entire board if necessary.
Addressing Gas Supply and Flow Issues
Ensure proper gas pressure and inspect the gas line for leaks or blockages. Check the gas valve for correct operation to maintain consistent fuel flow to the heater.
Consult a professional if gas supply problems persist after basic troubleshooting steps‚ as improper gas flow can lead to ignition issues or heater malfunction.
Checking for Proper Gas Pressure
Ensuring proper gas pressure is critical for the Jandy JXi heater’s operation. Start by turning off the heater and allowing it to cool. Locate the gas pressure regulator‚ typically near the gas valve. Use a manometer to measure pressure‚ comparing it to the manufacturer’s specifications. Low or high pressure can cause ignition issues or inefficient heating. Check for any blockages or leaks in the gas line‚ as these can disrupt pressure. If adjustments are needed‚ refer to the user manual or consult a professional. Proper gas pressure ensures safe and efficient operation‚ preventing errors like intermittent ignition or shutdowns. Always follow safety guidelines when working with gas systems.
Inspecting the Gas Line for Leaks or Blockages
Inspecting the gas line for leaks or blockages is a critical step in troubleshooting the Jandy JXi pool heater. Start by turning off the heater and ensuring the gas supply is disconnected. Visually examine the gas line for any signs of damage‚ corrosion‚ or wear. Check connections to ensure they are tight and secure. Use a soap solution to detect leaks—bubbles will form if gas is escaping. Additionally‚ inspect the sediment trap for debris or blockages‚ as this can restrict gas flow. If issues are found‚ repair or replace the affected components. Proper gas flow is essential for efficient and safe heater operation‚ so addressing these problems promptly is crucial. Regular inspections can prevent future disruptions and ensure optimal performance. Always follow safety guidelines when working with gas systems.

Water Flow and Pressure-Related Problems
This section addresses issues like low water flow or high pressure‚ which can disrupt the heater’s operation. It covers checking the pump‚ filter‚ and pipes for blockages or damage‚ ensuring proper water circulation and pressure balance for efficient heating.
Checking the Pool Pump and Filter System
The pool pump and filter system play a crucial role in maintaining proper water flow to the Jandy JXi heater. Ensure the pump is operational and set to the correct speed. A clogged or dirty filter can restrict water flow‚ leading to heater issues. Clean or replace the filter as needed‚ and check the skimmer and pump baskets for debris. Inspect the plumbing for blockages or kinks that could impede water circulation. Verify that all valves are fully open and properly aligned. If the system is not functioning correctly‚ it can cause the heater to shut off or fail to ignite. Addressing these issues can resolve many common problems with the Jandy JXi heater. Always ensure the system is clean and well-maintained to prevent future issues.
Inspecting the Heater’s Water Inlet and Outlet
Regular inspection of the Jandy JXi heater’s water inlet and outlet is crucial for ensuring proper water flow and preventing blockages. Start by turning off the power to the heater and allowing it to cool. Inspect the inlet and outlet for visible debris‚ mineral buildup‚ or corrosion. Use a soft brush or cloth to clean any noticeable obstructions. Check for leaks around connections and ensure all fittings are secure. If you notice reduced water flow‚ it may indicate a clogged filter or pump issue. Refer to the troubleshooting guide for specific steps to address flow-related problems. Proper maintenance here helps maintain efficiency and prevents premature wear on the heater. Always follow safety guidelines when handling electrical or gas components.
Inspecting the Manual Shut-Off Valve and Sediment Trap
Ensure the manual shut-off valve is fully open and free from obstructions. Clean the sediment trap regularly to maintain proper water flow and heater efficiency.
Locating and Operating the Manual Shut-Off Valve
The manual shut-off valve on the Jandy JXi pool heater is typically located near the gas inlet or along the gas line‚ ensuring easy access for maintenance.
To operate‚ turn the valve handle perpendicular to the gas line to shut off the supply. Always ensure the valve is in the “off” position before performing any maintenance or repairs.
This valve is crucial for safely servicing the heater‚ as it prevents gas flow. If issues arise‚ such as leaks or blockages‚ inspect and clean the valve or replace it if necessary to maintain proper function.
Cleaning the Sediment Trap for Optimal Flow
The sediment trap is a crucial component of the Jandy JXi pool heater‚ as it captures debris and contaminants that could disrupt gas flow. Over time‚ sediment buildup can restrict flow‚ leading to performance issues.
To clean the sediment trap‚ first‚ locate it near the manual shut-off valve. Turn off the heater and gas supply before starting. Use a wrench to disconnect the trap and empty it into a bucket. Rinse thoroughly with water‚ ensuring no debris remains.
Reassemble the trap and check for leaks. Regular cleaning prevents blockages and ensures efficient gas flow‚ maintaining optimal heater performance. This simple maintenance step can prevent more serious issues down the line.

Troubleshooting the PIB Board
The PIB board is a critical component of the Jandy JXi heater. Common issues include error codes and a red LED on the D4 indicator.
Check for loose connections or corrosion. If problems persist‚ replacing the PIB board may be necessary to restore proper heater functionality.
Recognizing Symptoms of a Faulty PIB Board
Identifying a faulty PIB board in your Jandy JXi pool heater involves observing specific behavioral patterns and error indicators. One common symptom is the heater failing to ignite or turning on and off repeatedly‚ which could indicate issues with the ignition system controlled by the PIB board. Additionally‚ error codes displayed on the LED‚ such as a red LED labeled D4‚ may signal a problem with the board itself. It’s essential to check for secure and undamaged wiring connections‚ as poor connections can mimic PIB board faults. After events like snowstorms‚ moisture-related issues might also affect the PIB board‚ necessitating inspection or replacement. Consulting a detailed troubleshooting guide or repair manual is recommended for accurate diagnosis and safe repair procedures.
Replacing the PIB Board if Necessary
The PIB board is a critical component of the Jandy JXi heater‚ controlling ignition and operational functions. If diagnosed faulty‚ replacing it is essential for restoring functionality. Ensure the heater is powered off before starting. Disconnect wiring connections carefully to avoid damage. Remove the old PIB board and install the new one‚ ensuring proper alignment and secure fastening. Reconnect all wiring precisely as before. After replacement‚ test the heater to confirm resolving the issue. If unsure about the process‚ consult a qualified technician to prevent further damage. Regular maintenance can help prevent such issues‚ ensuring reliable pool heating performance. Always follow safety guidelines when handling electrical components.

Dealing with Post-Winter Startup Issues
After winter‚ ensure the Jandy JXi heater is prepared for operation by inspecting for damage and resetting the system to restore functionality.
Check for any post-storm issues‚ such as moisture in components‚ and address them promptly to avoid startup problems and maintain efficient heating performance.
Preparing the Heater After a Snow Storm
After a snowstorm‚ inspect the Jandy JXi heater for any visible damage or debris. Ensure the unit is dry‚ as moisture can cause electrical issues. Check the gas supply lines for blockages or damage from freezing temperatures. Verify that the manual shut-off valve is fully open and functioning properly. Inspect the sediment trap for any debris that may have accumulated due to storm conditions. Perform a soft reset of the heater by turning it off and on again to clear any temporary faults. Finally‚ run a test cycle to ensure the heater operates smoothly before returning it to regular use.
Resetting the Heater and Checking for Damage
After a snow storm or prolonged inactivity‚ resetting the Jandy JXi heater is essential to ensure proper functionality. Start by locating the reset button‚ typically found on the control panel or near the ignition system. Press and hold the button for 5-10 seconds to reset the heater. Next‚ inspect the unit for visible damage‚ such as cracked components or corroded connections‚ which may have occurred due to freezing temperatures or debris. Check the gas line‚ electrical wiring‚ and water flow systems for blockages or leaks. If any damage is detected‚ address it immediately to prevent further issues. If the heater fails to restart or shows error codes‚ consult a professional for assistance.

Professional Assistance and Resources
Consult a qualified technician for complex issues like PIB board faults or persistent error codes‚ ensuring safe and effective repairs. Utilize recommended tools like multimeters for accurate diagnostics.
When to Call a Qualified Service Technician
If you encounter complex issues beyond basic troubleshooting‚ such as persistent error codes or internal component failures‚ it’s crucial to contact a certified technician. They specialize in diagnosing and repairing intricate problems like faulty PIB boards‚ gas valve malfunctions‚ or ignition control module issues. Additionally‚ if you’re unsure about handling natural gas systems or electrical components‚ professional assistance is essential for safety. A technician can also address post-winter startup challenges‚ ensuring your heater operates efficiently after seasonal downtime. Their expertise ensures repairs are done correctly‚ preventing further damage and maintaining your heater’s performance. Don’t hesitate to seek help when DIY solutions fall short.
Recommended Tools and Resources for DIY Troubleshooting
For effective DIY troubleshooting of your Jandy JXi pool heater‚ gather essential tools like a multimeter‚ pressure test kit‚ and wrench set. A voltage tester and gas line inspection kit are also crucial for diagnosing electrical and gas-related issues.
Download the official Jandy JXi service manual for detailed schematics and troubleshooting charts. Online forums and YouTube tutorials provide practical guidance for common problems like ignition failures or error code interpretations.
Invest in a thermal leak detector for identifying gas leaks and a pool heater maintenance kit to clean and replace worn-out parts. For complex issues‚ consult certified technicians or Jandy-authorized service centers to ensure safety and compliance with manufacturer guidelines.
Keep a troubleshooting checklist handy to systematically address issues‚ minimizing downtime and ensuring your pool heater operates efficiently year-round.
This guide empowers users to diagnose and resolve Jandy JXi issues effectively‚ ensuring consistent pool heating performance through regular maintenance and timely repairs.
By following these steps‚ you can address common problems‚ prevent future issues‚ and enjoy uninterrupted pool comfort with a well-maintained JXi heater.
To effectively troubleshoot your Jandy JXi pool heater‚ start by identifying error codes and LED indicators‚ as they provide crucial insights into the issue.
Check the igniter‚ flame sensor‚ and gas valve for proper function‚ and inspect wiring connections for looseness or corrosion. Ensure the thermostat settings are correct and address any interruptions in the heating cycle.
Verify gas pressure‚ inspect the gas line for leaks‚ and check the pool pump and filter system for optimal water flow. Clean the sediment trap and ensure the manual shut-off valve is functioning properly.
If issues persist‚ consider resetting the heater or replacing faulty components like the PIB board. Always consult professional assistance if problems are beyond your expertise.
Regular maintenance‚ such as cleaning filters and inspecting electrical connections‚ can prevent future issues and ensure reliable performance.
Preventative Measures to Avoid Future Issues
Regular maintenance is key to preventing issues with your Jandy JXi pool heater. Schedule annual professional inspections to ensure all components are functioning properly. Always check for loose wiring connections and clean the sediment trap regularly to maintain optimal water flow. Inspect the gas line for leaks or blockages before each heating season. After a snowstorm‚ reset the heater and inspect for damage to avoid startup problems. Additionally‚ ensure the pool pump and filter system are working efficiently‚ as poor water flow can strain the heater. By adhering to these preventative measures‚ you can extend the lifespan of your Jandy JXi and avoid unexpected breakdowns.
- Check electrical connections for tightness and corrosion.
- Clean the sediment trap to prevent debris buildup.
- Inspect the gas line for leaks or obstructions annually.
- Reset the heater after extreme weather conditions;
- Schedule professional maintenance at least once a year.